Turn a clear idea into a finished visual. Create images from text, edit with up to 10 references, and choose 1K, 2K or 4K for your next project.
Settings
Model
Ratio
Credits: -
Cost: 6 ⚡
🎁 New users get free credits upon signup — no card needed
One image per generation. Your selected resolution determines the credit cost. Sign in to save results in History; failed jobs return their generation credits.
One model. A whole visual workflow.
A campaign rarely ends with the first image. You need a composition that works, a product that stays recognizable, readable wording and versions for different placements. FLUX 3 Image brings text-to-image and reference editing into the same workspace, so you can explore a direction and then refine it without starting every brief from scratch. Begin at 1K, check the result at full size, and move to a larger resolution when the composition is ready.
The three generator examples and the NOVA → AURA comparison were created with FLUX 3 Image through WaveSpeed. Additional examples are credited to Black Forest Labs and WaveSpeed. Suggested prompts are starting points; each generation can differ.
Design around words that matter
A short headline can carry the entire image. Give FLUX 3 Image the exact wording in quotation marks, then describe its placement, scale and relationship to the artwork. This exhibition poster uses a restrained palette and clear hierarchy rather than a long list of style tags. When making a real campaign, inspect spelling, alignment and small lettering before exporting; image generation is a creative step, and your final copy check still matters.
Suggested prompt
An editorial exhibition poster on ivory paper. Headline "BLUE HOUR" in large condensed cobalt typography aligned top left; small subtitle "ART & DESIGN / 2026" directly below. A sculptural translucent blue glass sphere casts a long warm shadow in the lower half. Crisp print design, generous margins, refined typographic hierarchy, tactile paper grain. Show the complete poster edge to edge.
FLUX 3 Image · WaveSpeed · 1K
Change the detail. Keep the scene.
Start with an existing image and describe the change precisely. These comparisons show a focused edit rather than a new scene built from scratch.
One bottle, two campaign directions
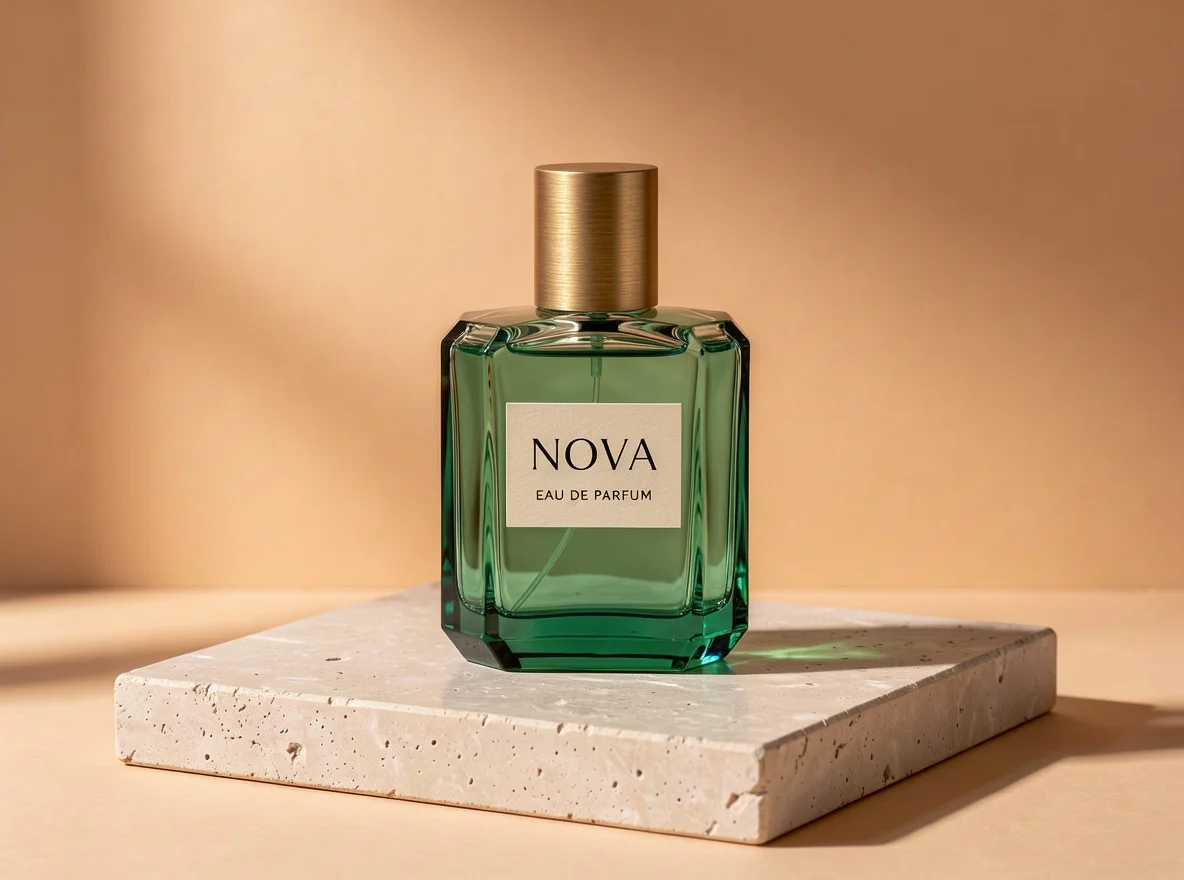
The original image was generated with FLUX 3 Image at 1K. We then used it as a reference and asked FLUX 3 Image to change the green glass to amber and the label from NOVA to AURA. The cap, pedestal and framing remain part of the same brief. This is a practical way to test a colorway or a packaging concept before committing to a larger export. Small reflections can shift during an edit, so check the details that matter to your product.
Before
After
Edit instruction
In image 1, change only the bottle glass to warm amber and its label word from NOVA to AURA. Preserve the gold cap, bottle geometry, label layout, pedestal, lighting, shadows and camera framing. Adjust the transmitted light to suit amber glass.
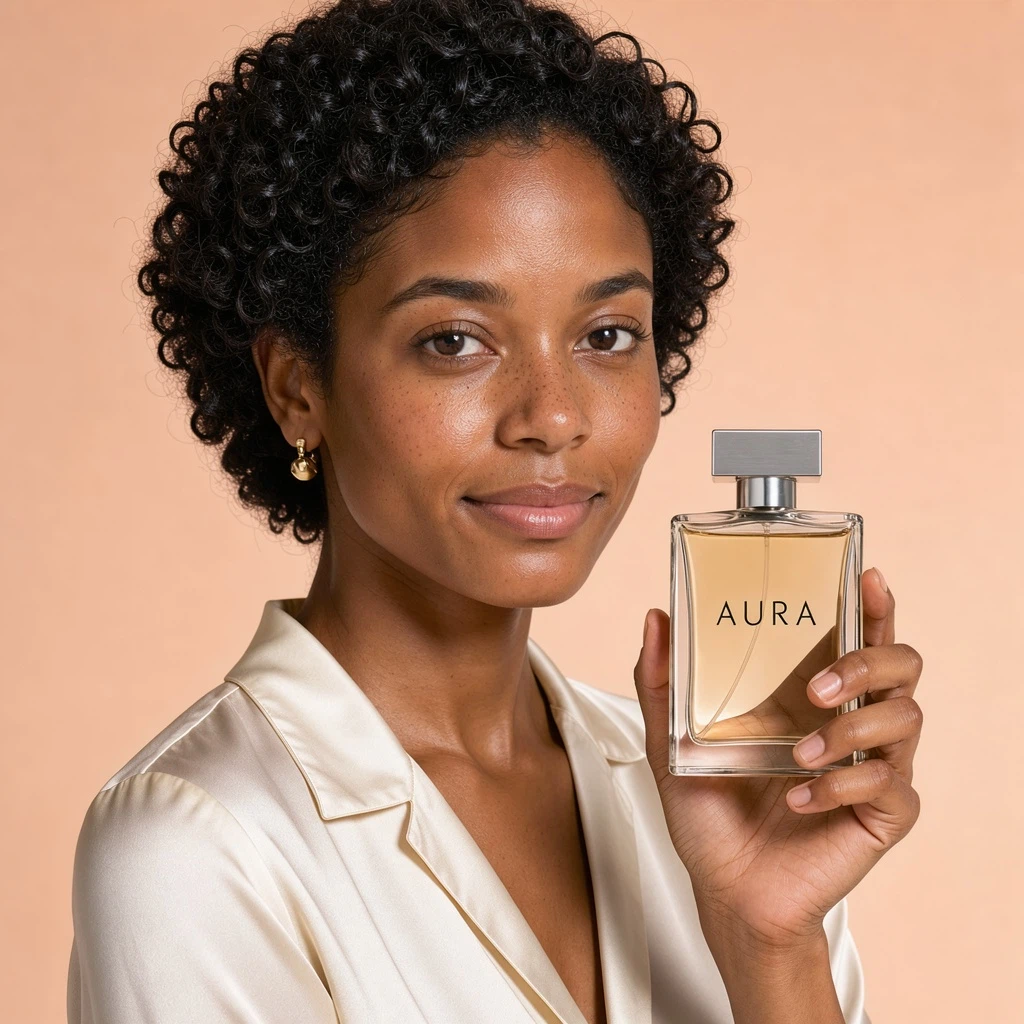
This published WaveSpeed example changes the bottle material, cap and lettering while retaining the portrait as the surrounding scene. It is a useful reference for writing a local edit: name the object, describe the replacement and list the surrounding details to preserve. Avoid changing the person, camera, background and product at once when you only need one new packaging direction. A focused instruction makes it easier to judge whether the edit did what you asked.
Before
After
Edit instruction
Edit the bottle in image 1 into emerald-colored glass with a satin gold cap and a NOCTURNE label. Preserve its outline and placement in the hand. Keep the person, pose, clothing and setting intact. Adapt the reflections to the new material.
Use image 1 for your subject, image 2 for a location and image 3 for a visual treatment. FLUX 3 Image accepts up to ten references, but a useful reference is better than an extra one. Explain what each image contributes and how the elements should fit together. For a fashion board, separate the garment, pose and set design in your brief. For a product scene, preserve the silhouette and label while borrowing the lighting or background from another image.
Suggested prompt
Use image 1 for the outfit and person, image 2 for the sculptural setting, and image 3 for the page layout. Build a refined fashion editorial with one dominant portrait and smaller detail panels. Keep the garment material and the subject recognizable. Match the lighting across every panel.
Glass, stone, fabric and wood each need a different kind of light. Describe the material before reaching for broad words such as “premium”. Our product example asks for green glass, brushed metal and travertine, then gives the light a clear direction. FLUX 3 Image can turn that brief into an image you can evaluate and edit. Leave space for a later crop or a headline, and use a reference when a specific product shape, logo or package must carry through.
Suggested prompt
Premium studio product photograph of a geometric emerald-green glass fragrance bottle with a brushed champagne-gold cap. The minimal cream label clearly reads "NOVA" with a small line "EAU DE PARFUM". Place it on a pale travertine pedestal, apricot background, sunlight from the left, natural soft shadows and realistic glass reflections. One elegant product, balanced composition, luxurious tactile material detail.
FLUX 3 Image · WaveSpeed · 1K
Explore more than one visual direction
Editorial scenes, interiors, product campaigns and graphic design call for different briefs. These FLUX 3 Image examples show a range of compositions you can study for lighting, hierarchy and framing.
FLUX 3 Image · WaveSpeed · 1K
Spaces & interiors
Describe the room structure, key furniture and time of day before adding a style. Use a restrained material palette to keep the composition coherent.
Give a scene a subject, an action and a focal point. A clear relationship between two characters often works better than several unrelated visual ideas.
State the parts that should appear and the direction of the layout. Verify labels and relationships carefully before sharing an instructional graphic.
Choose the resolution for the job
FLUX 3 Image on this page offers three output tiers. Start with 1K when you are testing composition, wording or a local edit. Choose 2K for a finished web asset that needs room for cropping. Use 4K when you need the larger output for a detailed crop or print preparation. A resolution tier describes approximate pixel count: a portrait and a landscape image will have different edge lengths.
1K
6 credits
Drafts, prompt experiments and social concepts. Check the direction before investing in a larger output.
2K
14 credits
Website artwork, campaign visuals and images you plan to crop for several placements.
4K
76 credits
Large exports, close crops and print preparation. Allow more processing time than a small draft.
The generation button shows your current cost before you submit. Reference count does not change this page’s per-image credit price. Each request produces one image.
How to create with FLUX 3 Image
01
Choose a starting point
Use Text to Image for a new scene. Choose Edit Image when you already have a subject or composition to work from. Upload references in the order you want to name them, and keep their roles distinct. You can open a sample and reuse its prompt without submitting a generation.
02
Write the brief and set the output
Describe the subject, setting, lighting and framing in plain sentences. Put requested lettering in quotes. For an edit, state the change and the details to preserve. Select an aspect ratio and resolution, then review the credit cost beside the generation button.
03
Generate, inspect and refine
Sign in and submit your brief. Follow the task in History, then inspect the image at full size. If a detail needs work, return to Edit Image with a focused instruction. Download the result when it is ready; keep a smaller draft for experimenting with a new direction.
A better brief is easier to edit
You do not need a long prompt. You need an unambiguous one. Build your request in this order, then remove anything that does not help describe the picture.
01Subject
Name the main object or person and what they are doing. Separate the hero subject from supporting props.
02Scene & light
Specify the setting, materials and one dominant light source. Say where the light comes from.
03Framing & text
Describe camera angle, crop and empty space. Quote exact wording and give it a clear position.
04Reference roles
Use image numbers to explain which input supplies identity, setting, shape or visual style.
05What stays
For an edit, list the important details to retain. Keep the requested change focused and easy to assess.
When the result needs another pass
The headline is misspelled or crowded
Shorten the wording, quote it exactly and reserve more space around it. Check small text at full size.
The product has drifted from the reference
Make the product reference image 1. Name the silhouette, label and distinctive parts you want to preserve.
Several references compete for attention
Remove redundant inputs and assign each remaining image a single role. Specify one focal point.
The image does not fit its placement
Choose the final aspect ratio and ask for space around the subject. Avoid relying on an aggressive crop.
Explore lighting and framing in the visual inspiration gallery, or read our FLUX 3 overview before planning your next composition.
Choose the workflow that fits your starting point
Create a new image
Choose text-to-image when the composition is still open. A brief can explore a mood, location, material or campaign concept without a source photograph. Begin with one subject and a clear focal point; use a smaller resolution to compare directions.
Work from a reference
Choose image editing when an existing subject or scene matters. Supply the source, describe the change and preserve the details you want to keep. This workflow is useful for product colorways, background changes and a composition that brings several references together.
When a finished still needs motion, continue with image-to-video.
For model context and image-versus-video workflows, read our FLUX 3 introduction.
FLUX 3 Image questions, answered
What is FLUX 3 Image?+
FLUX 3 Image is Black Forest Labs’ image generation and editing model. This page runs the actual model through WaveSpeed, with a single workspace for creating from text and editing from reference images. Flux AI is an independent website and is not Black Forest Labs’ official product.
How many reference images can I use?+
Edit Image accepts between one and ten references. PNG, JPEG and WebP are supported here. Each reference must be at least 256 pixels on both sides; larger images are resized to a maximum of four megapixels before upload. Explain each image’s role in your prompt, using its order as image 1, image 2 and so on.
Does FLUX 3 Image support 4K here?+
Yes. Choose 1K, 2K or 4K in the generator. The selection determines both the output tier and credit cost. The tier is an approximate pixel-count category, so exact width and height depend on aspect ratio. Larger outputs can take longer; the task remains in History while it is processing.
How many credits does an image cost?+
One 1K image costs 6 credits, 2K costs 14 and 4K costs 76. The same price applies to text-to-image and reference editing. Each request produces one image. The generator displays the cost before submission, and it checks your balance before creating a task.
Can I try it with signup credits?+
Eligible Google signups receive the site’s existing 8-credit welcome gift. At the 6-credit 1K price, that balance covers one image. Additional generations or larger output tiers require enough credits in your account. Signup eligibility and account balance are checked by the site.
Can I change only one part of a picture?+
Use Edit Image with a focused instruction. Name the object or area to change, describe its replacement and list the surrounding details to preserve. The comparisons on this page show specific product edits. Inspect the resulting image carefully, since small neighboring details or reflections can still shift.
How should I ask for text inside an image?+
Quote the exact words, keep them short and describe their position and scale. Specify a simple hierarchy such as one large headline and one smaller subtitle. When the image is intended for a real campaign, verify spelling and legibility at its final display size before publishing.
What happens if generation fails?+
Jobs that fail during creation or provider processing use the site’s existing credit-refund flow. The task’s failure and refund status are shown in History. A connection interruption while checking progress does not automatically mean the generation failed; reload History to check the saved task before submitting again.
Is this the FLUX 3 video model?+
This tool generates still images and edits reference pictures. It does not generate a video or audio. Use the site’s image-to-video workflow when you want motion from a finished image, and review that tool’s model, settings and credit price separately.
Bring your next idea into focus
Start with a sentence, a product photo or a set of references. Create a 1K draft, refine what matters and choose the output you need.